| Tiling | |
|---|---|
|
The Tiling tab allows you to control the tiling of your image. "Tiling" means separating the job into two or more pieces, and it is usually done because the image is too large for the page size or for display purposes. Click the [Tiling] tab in Job Editor to select these options:
Check [Enable Tiling] to use the options under the Tiling tab. Any portion of the image larger than the width of your page size is moved to another tile. When [Enable Tiling] is disabled, the image size is restricted to the maximum width defined under [Maximum Print Area:] in the “Preview and Size” tab.
The [Submit Tiles as Individual Jobs] option allows you to send each tile to RIP-Queue for printing as individual jobs. Using this option improves your speed because the first tile can begin printing while remaining tiles are being processed.
The [Tile Setup] tab (Figure 1) allows you to use and define tiles. Typically, you use this option to print images larger than your media or for display and mounting purposes.
Number of Tiles – This option allows you to specify the number of tile columns and rows in your image.
Include Bleed and Trim - This option will include Bleed and Trim into the tile size calculations.
This section] determines the size of each tile. To change the default tile size, type in the new dimension or use the up and down buttons.
If you set the default tile size to less than the maximum print width of the printer, the [Default Tile] size takes precedence. The actual tile width is the width entered under either the [Default Tile] or [Custom Tile] setting.
[Custom Tile] allows you to define the size of each specific tile
To adjust a tile’s size:
[Row] or [column] numbers count from upper left to lower right; those marked with an asterisk (*) use the default value for that dimension.
When you choose a print size larger than the maximum page size for the printer, the image preview displays tile lines inside the crop box. These appear as additional dotted lines similar to crop box lines. If your final output has multiple rows and columns, be aware that making adjustments to a single tile affects all tiles associated with the same row and column. All tiles in the same vertical column have the same width. All tiles in the same horizontal row have the same height.
If you want to print specific tiles, click
An Overlap is a portion of the image repeated on adjacent tiles. [Overlap Tile] helps you align and weld adjacent tiles.
[Overlap] has the following attributes:
To set the overlap, type in the new dimension or use the up and down buttons.
NOTE: The [Overlap] is divided equally to both sides of the tile; therefore a one-inch overlap will contain one-half inch of each adjoining tile. Tiles that are part of the outside edge of the image will have no overlap on the outside edge. When you set an overlap, you will see no change in the display image.
Weld Overlap - This option reserves a portion of the Overlap Tile area for the welding adhesive. Ink can inhibit the adhesive from forming a perfect bond when joining two tiles, and [Weld Overlap] ensures an ink-free area.
NOTE: You must have an Overlap Tile area of at least half an inch to use [Weld Overlap].
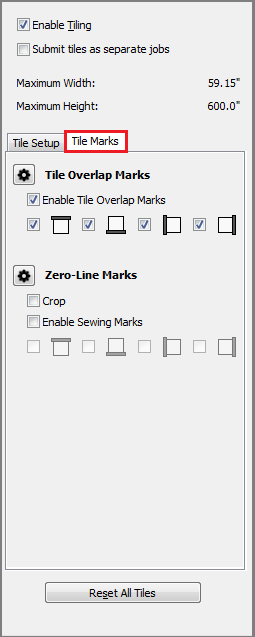
[Tile Marks] tab allows you to set [Tile Overlap Marks] and [Zero-Line Marks].
Tile Overlap Marks This option is used when tiling images with an overlap. This mark shows where the overlap begins and ends to help you combine tiles easily. When piecing the tiles together, the [Tile Overlap Marks] mark of one tile overlays the corresponding mark on the adjacent tile.
You also can set mark line style by clicking
Zero-line Tile Mark This option prints a black crosshair with a white inner portion in the middle of the tile overlap area. Check the [Crop] or [Sewing] boxes. Click the
Crop – This option defines an area of your image that will not be printed. Sewing – This option allows you to add accurate marks to your job for folding or hemming after the job is printed. [Sewing] marks are commonly used with Tiling.
|
Figure 1
Figure 2
|
 icon on the toolbar. This opens “Page/Tile Print Selection” dialog. In default settings, all rows and columns are checked. Uncheck [Select/Deselect All] and check boxes that you want to print.
 button. This opens “Setup Mark Line Style” dialog (Figure 2)...
 button to open the “Setup Mark Line Style” dialog (Figure 2).